So you’re adding content to your Moodle course and you want to display it in an organised, methodical way.
Course sections work fine but each section has a lot of content, and you don’t feel it’s appropriate to split your course into more sections.
So you try using labels as subheadings and that’s OK – but this just lengthens the course – and everyone keeps telling you about that Moodle ‘scroll of death’ thing!
You like ‘Show only one section per page” but it confuses some of your learners, and anyway – you need all modules visible on the page.
What you’re really looking for is what you’ve seen in other LMS, where you can put content into folders. But Moodle’s folders are for documents, not activities. If only you could have activity folders inside your course sections – that learners could open and close when needed…
Actually, you can! Not with folders, but with links within the course sections themselves. Links that take you off to a space where you can add as much extra content as you like, of any type. You just need your Moodle site administrator to install the very popular Flexible sections course format plugin (which they can do from the install plugins link in site administration) and you’re ready to start organising!
How does it work for teachers?
Once the administrator has installed the flexible sections course format, it becomes available as an option in your course administration edit settings page.
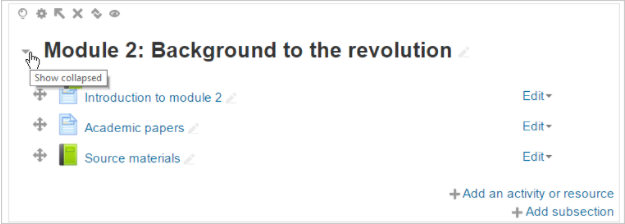
As a teacher, the first thing you’ll notice when you come back to your course, once you’ve selected Flexible course format, is that each section has borders around it, and when the editing is turned on, extra icons and links to manage the sections and add subsections (sections within the section) are available. Even without adding subsections, you can collapse a section so the content can only be accessed by clicking the link. Here it is in editing view:
And here’s what the student would see:

Imagine a course with all sections collapsed like that – no more scroll of death!
But that’s not the main purpose of this course format. Its biggest plus is that you can add extra sections within a course section and then decide whether to show those subsections expanded or collapsed. So, taking our current Module 2 as an example, we can click to ‘Add subsection’ and then either add new activities or drag existing ones to our new subsection. Then we just have to decide whether to show those activities directly on the page or to collapse them inside a link.
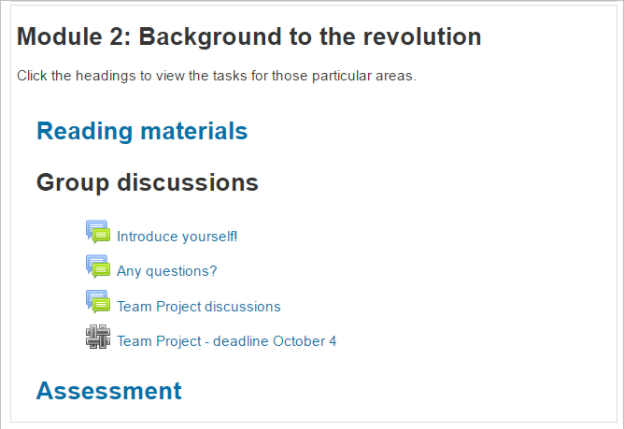
So it’s similar to the display of whole course sections but it means you have so much more control over what you show and don’t show within sections. Here for example, the reading materials subsection is displayed expanded, while the other two subsections are collapsed:

The best thing about Flexible sections is…
Just because you can display subsections on the page or keep them collapsed doesn’t mean they have to stay like that for the whole course. For instance, in our example above, maybe after the first two weeks you expect your students to have read the materials and you want them to focus on the group discussions instead?
So collapse the reading materials section and expand the group discussions one. The reading materials are still available; they’re just no longer ‘in your face’! That’s where the flexibility comes into it; adapt them as the course progresses.
How does it work for students?
This is what Module 2 looks like to students when we changed the subsections, so reading materials are collapsed and group discussions are displayed:
Students won’t have difficulties accessing these subsections as long as they understand that the links are links that open up to display the contents of the subsections. We’re just using the standard Clean theme here and the links are blue as you’d expect. If you have a custom theme you might like to check how they display for your students.
Navigation is easy too, here’s what a student sees when she clicks the reading materials link:
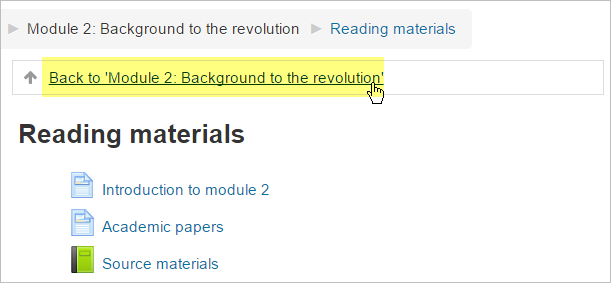
Once she’s done with reading the content, she has a clear way back to the course section she just left.
Worth noting: on the Moodle Mobile App, all subsections will appear collapsed – but that’s OK!
To recap:
While labels and indenting can work for some, they don’t have the advantage of allowing you to collapse the content, so you still end up with long sections and even longer course pages.
Flexible Sections Course Format is an easy-to-use plugin for any teacher or course tutor who needs control over how the content within sections is displayed. It’s developed and maintained by Marina Glancy, Moodle HQ’s Development Process Manager, so you can be sure it will be kept up to date and secure.
With Flexible Sections you can customise each section of your course separately: you can have one section expanded or collapsed, a section with several subsections expanded or collapsed – and – alter the display to suit the needs of the students. Appearance might not be everything, but it is certainly half the battle when getting learners engaged. If their first impressions of your course are of organised, easy to navigate sections, they’ll be more likely to return and get involved!